
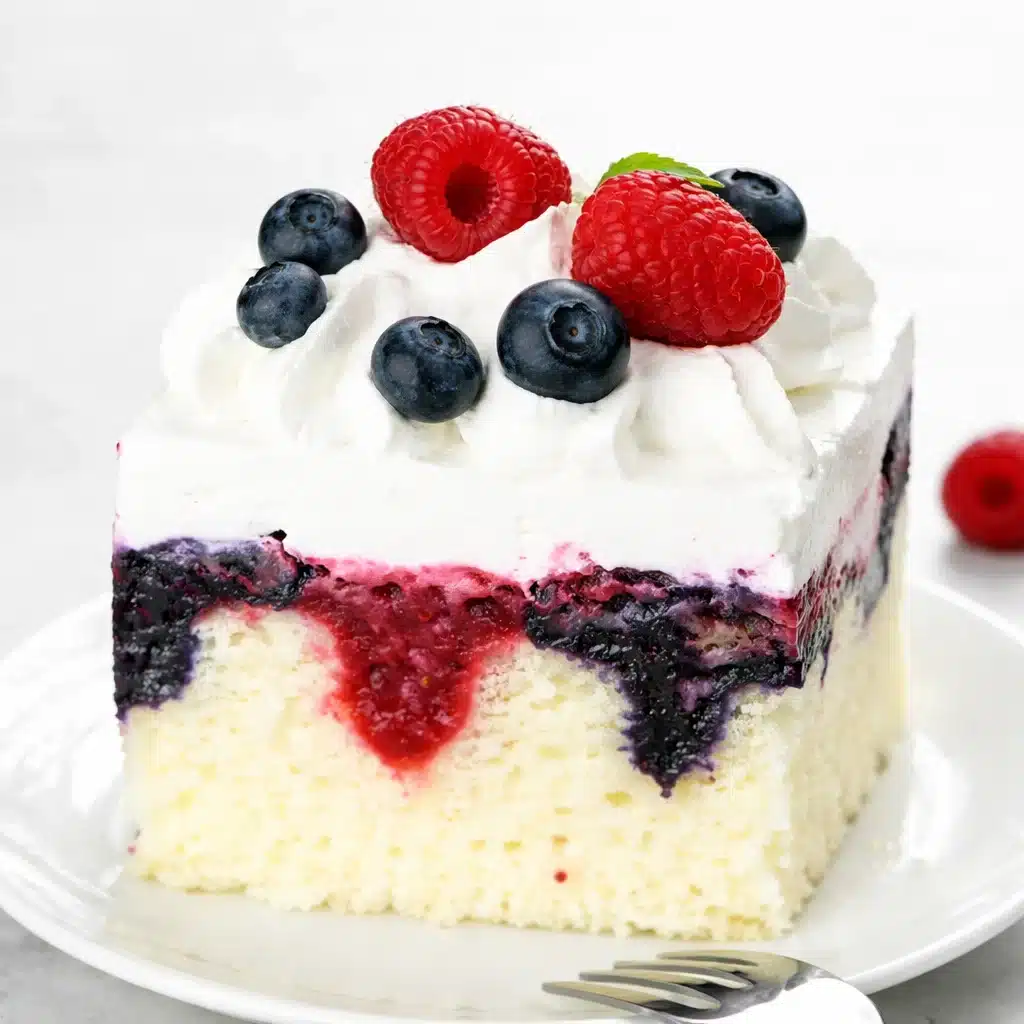
If you’re looking for a dessert that combines ease, flavor, and a touch of holiday magic, look no further than this Berry Poke Cake. This vibrant treat is perfect for any occasion, from the 4th of July to your next summer potluck. Imagine a moist cake bursting with sweet berry sauces, creamy cheesecake filling, and topped with a mountain of fresh whipped cream and berries.
It’s a party in your mouth, and everyone will be asking for the recipe. And, the best part? It’s no-bake! Who has time for complicated desserts when there’s so much fun to be had? Grab your cake mix, berries, and a few simple ingredients to create this delicious masterpiece. The Berry Poke Cake is as easy to make as it is to enjoy!
Table of Contents
What is Berry Poke Cake?
The Berry Poke Cake is a modern twist on the classic poke cake, where the cake is “punched” with holes and filled with a flavorful sauce. In this recipe, we use two kinds of berry sauces — a rich red strawberry and raspberry mix and a blue blueberry sauce — to create a patriotic, red, white, and blue masterpiece. The cake is topped with a dreamy cheesecake filling, whipped cream, and a colorful garnish of fresh berries.
It’s the perfect dessert for summer gatherings, a picnic, or a holiday celebration like the 4th of July. The combination of tangy berries and creamy layers is a crowd-pleaser every time, offering a refreshing balance between the richness of the cream cheese filling and the burst of fruit.
Reasons to Try Berry Poke Cake
If you’re still not sold, let’s chat about why this Berry Poke Cake should be your go-to dessert. First off, it’s absolutely delicious. The layers of fruity berry sauce soak right into the cake, making each bite moist and bursting with flavor. It’s the kind of dessert that makes everyone go “Mmm, what is that?!” The combination of creamy, tart cheesecake filling and the sweet berry topping is simply irresistible. Secondly, it’s incredibly easy to make.
No need for fancy baking techniques, just a simple box of cake mix, a few berries, and some whipped cream. Oh, and did I mention no-bake? Yes, you can make this ahead and keep it in the fridge, making it perfect for those hot summer days when you don’t want to turn on the oven. Plus, it’s pretty to look at. The bold colors are sure to impress your guests, even before the first bite.
Ingredients Needed to Make Berry Poke Cake
For this easy-to-make dessert, you’ll need a few simple ingredients, most of which you likely already have in your pantry and fridge. Here’s what you’ll need to gather:
- For the cake:
- 1 box white cake mix (along with the ingredients listed on the box for making the cake)
- For the strawberry and raspberry sauce:
- 1 ½ cups diced strawberries
- 1 ½ cups raspberries
- ½ cup sugar
- 1 tablespoon lemon juice
- 1 tablespoon water
- 2 teaspoons gelatin powder (dissolved in 2 tablespoons of water)
- For the blueberry sauce:
- 2 ½ cups blueberries
- ½ cup sugar
- 1 tablespoon water
- 1 tablespoon lemon juice
- 2 teaspoons gelatin powder (dissolved in 2 tablespoons of water)
- For the cheesecake filling and topping:
- 8 oz cream cheese (room temperature)
- 2 cups heavy whipping cream
- 2 teaspoons vanilla extract
- 1 cup powdered sugar
- Fresh berries for garnish
Once you have everything together, you’re ready to start the fun process of assembling your Berry Poke Cake!
Instructions to Make Berry Poke Cake
Step 1: Prepare the Cake
Start by preparing the cake mix according to the package directions, but bake it in a 9×13-inch dish. This will be your base for all the deliciousness to come. Once the cake is baked, take it out of the oven and let it cool for a bit. While it’s still warm, use the handle of a wooden spoon to poke holes all over the cake, about 1 inch apart. These holes will allow the berry sauces to sink deep into the cake, infusing every bite with flavor. Once you’ve poked your cake, set it aside to cool completely.
Step 2: Make the Red Strawberry and Raspberry Sauce
To create the red berry sauce, start by combining 1 cup of strawberries and 1 cup of raspberries in a medium saucepan. Add the sugar, lemon juice, and water, and bring everything to a simmer. Stir it frequently to make sure nothing burns. Let the mixture cook for about 5 to 8 minutes, until the fruit softens and starts to release its juices. After that, use a potato masher to mash the berries into a chunky consistency. Add the dissolved gelatin and stir it in until the gelatin melts completely. Lastly, throw in the remaining diced strawberries and raspberries. Stir to combine, then set the sauce aside to cool.
Step 3: Make the Blueberry Sauce
Now it’s time to make the blueberry sauce. In a separate saucepan, combine 1 ½ cups of blueberries, sugar, lemon juice, and water. Again, bring it to a simmer and cook until the berries soften, stirring occasionally. Use the potato masher to mash the berries, then add the dissolved gelatin. Stir until the gelatin is fully incorporated. Add the remaining blueberries and let everything mix together. Set this sauce aside to cool as well.
Step 4: Fill the Cake with Berry Sauces
Once the berry sauces have cooled, it’s time to fill the holes in your cake. Start with the red strawberry and raspberry sauce and carefully spoon it into the holes, making sure each one is filled to the brim. Then, use the blue blueberry sauce to fill the remaining holes. Feel free to alternate between the two sauces for a fun, festive look. Don’t worry if some of the sauce spills over the top of the cake, it’s all part of the fun. After the sauce is added, place the cake in the fridge to set the sauces.
Step 5: Make the Cheesecake Filling
While the cake is chilling, it’s time to whip up the cheesecake filling. Start by beating the softened cream cheese and half of the powdered sugar until smooth and creamy. Set it aside. In a separate bowl, whip the heavy cream, vanilla extract, and the remaining powdered sugar until stiff peaks form. You’ll want about 4 cups of whipped cream. Now, gently fold 2 cups of the whipped cream into the cream cheese mixture. Use a spatula to mix until fully combined, scraping down the sides of the bowl as needed.
Step 6: Assemble the Cake
Once the cake and sauces are ready, spread the cheesecake filling over the top of the cake. Be generous — this is the creamy goodness that will complement the berry sauces beautifully. Use the back of a spoon or an offset spatula to smooth it out. Next, place the remaining whipped cream into a piping bag fitted with a star tip (or simply use a spoon) and pipe swirls of whipped cream over the cheesecake layer. You can get creative here or keep it simple! Finish by garnishing with fresh berries on top. Now, let the cake chill in the fridge for a few hours to set completely.
What to Serve with Berry Poke Cake
While the Berry Poke Cake is decadent on its own, serving it alongside a few lighter options can balance things out beautifully. Consider pairing it with a refreshing fruit salad (like a watermelon cucumber salad), or a crisp green salad with a tangy vinaigrette. If you’re having a more casual get-together, try serving the cake alongside easy appetizers, such as buffalo chicken dip or a platter of grilled vegetables. And if you’re really feeling festive, why not make a strawberry lemonade or blueberry iced tea to go along with the cake? Trust me, it will be the perfect complement to the rich, sweet flavor of the dessert.
Key Tips for Making Berry Poke Cake
- Let the cake cool completely before filling it with sauces. This ensures that the berry sauces soak in without melting the cake or making it soggy.
- Consistency of the berry sauces: If your berry sauces are still runny after cooling, place them in the fridge and stir occasionally until they thicken up. If they become too thick, simply reheat them gently.
- Whipped cream: For the fluffiest whipped cream, make sure your heavy cream is well-chilled before whipping it. If you don’t have a piping bag, no worries — you can always spread the whipped cream with a spatula or spoon.
- Berry varieties: Feel free to play around with the berries. If you can’t find raspberries, try using blackberries or even a combo of strawberries and blueberries for the sauces.
Storage and Reheating Tips for Berry Poke Cake
If you have any leftover Berry Poke Cake, you can store it in the fridge for up to 3 days. Just be sure to cover it with plastic wrap or a tight-fitting lid to keep it fresh. The cake actually gets even better as it sits in the fridge, as the flavors continue to meld together. Just remember, because of the whipped cream topping, it’s best to keep it chilled. As for reheating, there’s really no need — it’s best enjoyed cold straight from the fridge.
FAQs
Can I use frozen berries for the sauces?
Absolutely! Frozen berries work just as well as fresh. Just make sure to thaw them before cooking.
How can I make this cake gluten-free?
You can easily swap out the cake mix for a gluten-free version. Just follow the instructions on the box as you would for a regular cake mix.
Can I make this cake ahead of time?
Yes, this cake is perfect for making ahead. You can assemble it the day before your event and keep it in the fridge until you’re ready to serve.
Final Thoughts
There you have it — the Berry Poke Cake that’s sure to steal the show at your next gathering! With its irresistible combination of sweet, creamy, and fruity layers, this cake is a dessert that everyone will love. It’s simple to make, visually stunning, and a total crowd-pleaser. So, the next time you’re looking for a dessert that’s as fun to make as it is to eat, remember this one. Enjoy it at family barbecues, holiday picnics, or just because you deserve something sweet. And hey, if you want more delicious and easy dessert ideas, be sure to check out our other recipes, like this Blueberry Cheesecake Bars or Strawberry Shortcake Cupcakes. Happy baking!
Visit our Pinterest for regular slow cooker recipe updates, or join our Facebook discussions where cooking fans exchange their favorite hearty meal ideas.
Print“Berry Poke Cake: The Ultimate No-Bake Dessert for Your Next Party”
Summer Berry Poke Cake is a colourful twist on a classic poke cake, filled with homemade sweet berry sauce, cheesecake filling and whipped cream and fresh berries topping. Red, white, and blue colour combo makes it perfect patriotic dessert for 4th of July, or any summer potluck or party.
- Prep Time: 1 hour
- Total Time: 1 hour
- Category: Dessert
- Method: no-bake
- Cuisine: American
Ingredients
- Cake:
- 1 box white cake mix
- ingredients listed on the box
- Strawberry and Raspberry Sauce:
- 1 1/2 cup diced strawberries
- 1 1/2 cup raspberries
- 1/2 cup sugar
- 1 Tablespoon lemon juice
- 1 Tablespoon water
- 2 teaspoons gelatin powder dissolved in 2 Tablespoons water
- Blueberry Sauce:
- 2 1/2 cups blueberries
- 1/2 cup sugar
- 1 Tablespoon water
- 1 Tablespoon lemon juice
- 2 teaspoons gelatin powder dissolved in 2 Tablespoons water
- Cheesecake Filling and Topping:
- 8 oz. cream cheese – room temperature
- 2 cups heavy whipping cream
- 2 teaspoons vanilla
- 1 cup powdered sugar
- fresh berries for garnish
Instructions
1. Prepare the cake according to package directions and bake in 9 x 13-inch dish. When the cake is baked remove from the oven. Using a handle of a wooden spoon, poke the holes about 1 inch apart. Set aside to cool.
2. In two small bowls dissolve 2 teaspoons gelatin in 2 Tablespoons water in each and set aside to bloom.
3. To make the red sauce in a medium saucepan, combine about 1 cup of strawberries and 1 cup of raspberries, sugar, lemon juice and 1 Tablespoon of water. Bring to a simmer and cook until the fruits soften, stirring frequently, about 5-8 minutes. Then using a potato masher, mesh the berries, add dissolved gelatin and remaining diced strawberries and raspberries, stir over medium heat until gelatin melts completely. Set aside to cool.
4. To make the blueberry sauce in a medium saucepan, combine about 1 1/2 cups of blueberries, sugar, lemon juice and 1 Tablespoon of water. Bring to a simmer and cook until the berries soften, stirring frequently. Then using a potato masher, mesh the berries, add dissolved gelatin and remaining blueberries, stir over medium heat until gelatin melts completely. Set aside to cool.
5. When the sauces are cooled and slightly thickened, spread them over the cake. Fill the holes alternately with red and blue sauce. Using the back of the spoon, get as much sauce as possible in the holes, and spread remaining on top. Place the cake in the fridge to set the sauce completely.
6. To make the topping, beat softened cream cheese and 1/2 cup powdered sugar, then set aside.
7. Beat heavy whipping cream, vanilla and 1/2 cup powdered sugar until firm peaks form. Divide in half.
8. Add 2 cups of beaten heavy cream to the cream cheese mixture and mix until combined. Scrape down with the spatula to incorporate everything well, then spread over the cake.
9. Transfer remaining 2 cups of whipped cream into a piping bag with a star tip and make swirls on top, or simply spread with a spoon over the cream cheese mixture. Store in the fridge.
10. Garnish with fresh berries before serving.
Notes
When making berry sauces, after cooling them to room temperature, if the sauces are still very runny you can place them in the fridge, but stir from time to time. They should be pourable but not too runny while filling the cake, something like unset pudding. If they thicken too much, you can reheat them to get desired consistency.


