
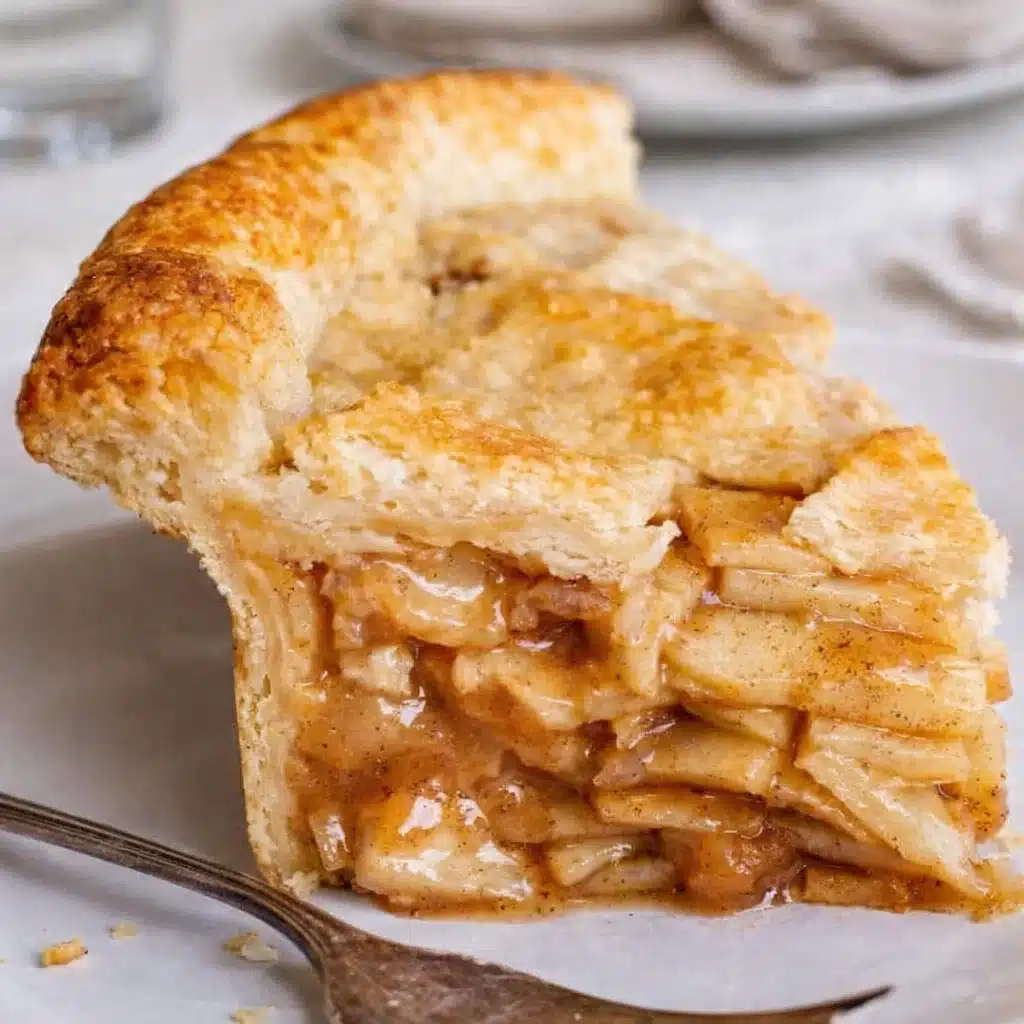
There’s something downright magical about the Best Apple Pie—the way the sweet scent of baked apples, cinnamon, and butter fills your kitchen, the golden flaky crust that shatters just right with each bite, and the warm, gooey filling that practically begs for a scoop of vanilla ice cream. This isn’t your run-of-the-mill apple pie; it’s the pie that turns skeptics into believers.
I should know—because I used to be an apple pie doubter myself. Too mushy, too bland, too “meh.” But then I discovered the method that changes everything—cooking the apples first. Trust me, this step is the secret to perfect texture and flavor every single time. Whether you’re baking it for Thanksgiving or just a cozy Sunday, this Best Apple Pie recipe will make you feel like the star of your kitchen.
Table of Contents
What is Best Apple Pie?
The Best Apple Pie is the epitome of classic American dessert comfort—sweet yet tart apples baked inside a double butter crust. What makes this pie “the best” isn’t just the fresh apples or the rich, buttery pastry—it’s the balance of flavors and the cooked filling technique that prevents a soggy crust. Unlike most pies, where the apples are baked raw in the shell, this one cooks the filling beforehand, giving you tender yet distinct apple slices wrapped in a syrupy caramel-like sauce. Imagine the warmth of cinnamon, the brightness of lemon, and the aroma of nutmeg—all working together for a pie that’s melt-in-your-mouth good.
Reasons to Try Best Apple Pie
Why try the Best Apple Pie when there are thousands of apple pie recipes online? Simple—it delivers results that actually live up to the name. The filling never turns into apple soup, the crust bakes up golden and crisp, and the balance of tart and sweet hits just right. This pie holds its shape when sliced, which means no more pie puddles.
Plus, the recipe uses everyday ingredients and simple steps that anyone—yes, even if you’re new to baking—can follow. And if you’re the type who loves a showstopper dessert that looks straight out of a bakery window, a lattice top will do just that. Need more dessert inspo? Try my Peach Coffee Cake or the crowd-favorite Strawberry Earthquake Cake next.
Ingredients Needed to Make Best Apple Pie
Here’s everything you’ll need to whip up the Best Apple Pie:
- 1 homemade double pie crust (2 sheets of pie dough)
- ¼ teaspoon lemon zest
- 2 tablespoons lemon juice (from half a lemon)
- 5 pounds apples (before peeling and coring)—a mix of Granny Smith, Gala, and Golden Delicious works best
- ¾ cup packed brown sugar
- ¾ cup granulated sugar
- 5 tablespoons all-purpose flour
- ¼ teaspoon kosher salt
- 1½ teaspoons cinnamon
- ¾ teaspoon nutmeg
- ½ teaspoon cardamom (optional but lovely)
- 1 teaspoon vanilla extract
- 1 tablespoon milk (for brushing)
- 1 tablespoon beaten egg (optional, for extra shine)
- 1 tablespoon raw sugar (for sprinkling)
Instructions to Make Best Apple Pie – Step by Step
Step 1: Choose and Prepare Your Apples
Start your Best Apple Pie journey with the right apples. You’ll need about 5 pounds—roughly 11 large ones. Mixing apple types gives you depth of flavor: Granny Smith for tartness, Gala for sweetness, and Golden Delicious for balance. Peel and slice each apple about ⅛ inch thick. I like to peel one apple at a time, then slice it right into a bowl with lemon juice to prevent browning. Stir occasionally to keep the slices fresh and tangy.
Step 2: Cook the Filling
Grab a large skillet or saucepan and zest ¼ teaspoon of lemon peel into it. Add the lemon juice, then all your apple slices. Toss in the brown sugar, white sugar, flour, salt, cinnamon, nutmeg, and cardamom. Stir gently so you don’t turn your apples into applesauce. Over medium heat, cook the mixture for about 20 minutes, stirring every few minutes, until the apples are tender but still hold their shape.
This is the key step that makes this the Best Apple Pie—the filling thickens and flavors develop beautifully before baking. If the apples start to stick, add a tablespoon of water. Once done, stir in the vanilla. Spread the filling onto a sheet pan and chill it for at least 30 minutes. This cooling step keeps your pie crust flaky.
Step 3: Prepare the Pie Crust
While your filling cools, roll out your homemade pie crust. Lay one sheet into your pie dish, leaving some overhang. If you’ve never made crust before, don’t panic—check out my detailed pie crust tutorial for tips on keeping it tender and buttery. Chill the lined crust while you prep the top crust or lattice.
Step 4: Fill and Assemble
Once the filling has cooled completely, spoon it into your pie shell, making sure to scrape in every bit of the gooey caramel-like syrup. Place your top crust over the filling or create a lattice pattern for that classic bakery look. Trim, fold, and crimp the edges however you like. If you went with a full crust, cut a few slits for steam to escape.
Step 5: Chill the Pie Before Baking
Pop the assembled pie into the fridge for 20–30 minutes. This prevents your butter from melting too soon in the oven and keeps your crust extra flaky. Meanwhile, preheat your oven to 425°F and place a baking sheet on the middle rack to catch any spills and heat the bottom evenly.
Step 6: Add That Golden Shine
Just before baking, brush your pie crust with milk or a mix of milk and beaten egg for a glossy, golden look. Sprinkle the top with raw sugar—it adds sparkle and a subtle crunch.
Step 7: Bake to Perfection
Place your chilled pie on the preheated baking sheet and bake at 425°F for 15 minutes. Then lower the oven temperature to 350°F. Cover the edges with a foil ring to prevent over-browning and bake for another 40–45 minutes, until the top is golden and the filling bubbles up through the lattice. That bubbling means the filling inside is perfectly thickened.
Step 8: The Hardest Part – Let It Cool
When your Best Apple Pie emerges from the oven, it’s going to smell heavenly—but resist the urge to cut it right away. Let it cool on a wire rack for at least 4 hours. This allows the filling to set properly, so each slice holds its shape. Patience pays off here!
Step 9: Serve and Enjoy
Once cooled, slice your masterpiece and serve with a generous scoop of vanilla ice cream. Feeling fancy? Drizzle on a bit of caramel sauce or pair it with a dollop of whipped cream. My husband insists this step is non-negotiable, and honestly, I agree.
What to Serve with Best Apple Pie
Nothing pairs better with Best Apple Pie than classic vanilla ice cream, but you can also mix it up with caramel drizzle, cinnamon whipped cream, or even a sprinkle of cheddar cheese (yep, it’s a thing—and surprisingly delicious). If you’re hosting dinner, pair your pie with something light beforehand, like Chickpea Beet and Feta Salad or Honey Lime Chicken with Mango Salsa.
Key Tips for Making Best Apple Pie
- Use a mix of apple varieties for the best flavor.
- Chill your pie dough and filling before baking for extra flakiness.
- Don’t skip the lemon—it brightens the entire pie.
- Let the pie cool fully before slicing; it’s worth it.
- Always bake your pie on a preheated sheet pan to keep the bottom crust crisp.
Storage and Reheating Tips Best Apple Pie
You can keep your Best Apple Pie at room temperature for two days, loosely covered. After that, refrigerate it for up to five days. Reheat slices in the oven at 350°F for about 10 minutes to revive that fresh-baked taste. You can also freeze the cooled pie for up to three months—just wrap it tightly in plastic and foil. To serve, thaw overnight in the fridge, then warm it in the oven.
FAQs
Can I use store-bought crust? Absolutely! While homemade crust is amazing, a good-quality store-bought one works fine for busy days.
What are the best apples to use? A mix of tart and sweet apples—like Granny Smith and Gala—gives the perfect balance.
Can I make the filling ahead of time? Yes! Cook and cool it, then refrigerate or freeze it. It’s great for make-ahead holiday prep.
How do I know when my pie is done? When the crust is golden brown and the filling bubbles up through the vents or lattice.
Final Thoughts
This Best Apple Pie recipe is more than dessert—it’s a slice of nostalgia, a reminder of home, family, and the joy of baking something from scratch. Whether you’re serving it at Thanksgiving, a family gathering, or just because it’s Wednesday, it never fails to impress. So grab your apron, preheat that oven, and let the magic happen one buttery, cinnamon-kissed bite at a time.
Visit our Pinterest for regular slow cooker recipe updates, or join our Facebook discussions where cooking fans exchange their favorite hearty meal ideas.
PrintBest Apple Pie – Old-Fashioned Flavor with Modern Ease
This classic homemade apple pie has a flaky double crust and a rich, spiced filling made from a mix of apples. The cooked filling gives perfect texture and flavor every time.
- Prep Time: 20 minutes
- Cook Time: 1 hour 20 minutes
- Total Time: 5 hours 40 minutes
- Yield: 10 servings 1x
- Category: Dessert
- Method: Baking
- Cuisine: American
Ingredients
- 1 homemade double pie crust, 2 sheets of pie dough
- 1/4 teaspoon lemon zest
- Juice from half a lemon, about 2 tablespoons
- 5 pounds apples, before peeling and coring (Granny Smith, Gala, Golden Delicious recommended)
- 3/4 cup brown sugar, packed
- 3/4 cup granulated sugar
- 5 tablespoons all purpose flour
- 1/4 teaspoon kosher salt
- 1 & 1/2 teaspoons cinnamon
- 3/4 teaspoon nutmeg
- 1/2 teaspoon cardamom (optional)
- 1 teaspoon vanilla extract
- 1 tablespoon milk, for brushing
- 1 tablespoon beaten egg (optional), for brushing
- 1 tablespoon raw sugar, for topping
Instructions
1. Choose your apples. Use a mix of Granny Smith, Gala, and Golden Delicious for best flavor.
2. Zest 1/4 teaspoon lemon peel into a 12-inch high-sided skillet. Add the juice from half the lemon (about 2 tablespoons).
3. Peel and slice apples one at a time into 1/8-inch pieces. Stir into lemon juice in skillet to prevent browning.
4. Once all apples are sliced, place skillet over medium heat. Add brown sugar, granulated sugar, flour, salt, cinnamon, nutmeg, and cardamom. Stir gently.
5. Once mixture is moistened, cover and cook for 20 minutes, stirring every 3 minutes, until apples are fork-tender but still hold shape.
6. Add 1 tablespoon water as needed if apples stick. Remove from heat and stir in vanilla.
7. Transfer filling to a sheet pan and spread out. Cool completely in fridge or freezer (about 30 minutes).
8. Roll out one sheet of pie dough into a 9-inch deep pie dish with excess hanging over edges.
9. Add chilled apple filling to the pie crust, scraping in all juices and gooeyness.
10. Top with second pie crust. Create lattice or leave whole. If whole, cut vents into top.
11. Fold edges and crimp. Chill pie in fridge or freezer for 20–30 minutes.
12. Preheat oven to 425°F with a baking sheet on the center rack.
13. Brush crust with milk, egg, or both. Sprinkle with raw sugar.
14. Place chilled pie on hot baking sheet. Bake at 425°F for 15 minutes.
15. Prepare foil crust shield: fold foil into quarters, cut out center, and unfold.
16. Reduce oven temp to 350°F. Add foil shield to protect edges. Bake 40–45 minutes more.
17. Pie is done when edges are browned and center is golden, with filling bubbling.
18. Cool on wire rack for 4 hours before slicing to allow filling to set.
19. Serve with vanilla ice cream and caramel sauce, if desired.
20. Store covered on counter for 2 days, then refrigerate.
Notes
Use a mix of apple varieties for best flavor and texture.
Cooling the cooked filling before adding it to the crust helps prevent soggy bottom.
The pie filling can be made in advance and frozen for up to 3 months.
Milk gives a matte crust; egg wash adds shine.
Wait the full 4 hours before slicing or the filling will be too runny.
Nutrition
- Serving Size: 1 slice
- Calories: 465
- Sugar: 56g
- Sodium: —
- Fat: 12g
- Saturated Fat: 4g
- Unsaturated Fat: 7g
- Trans Fat: 1g
- Carbohydrates: 89g
- Fiber: 7g
- Protein: 4g
- Cholesterol: 6mg


