
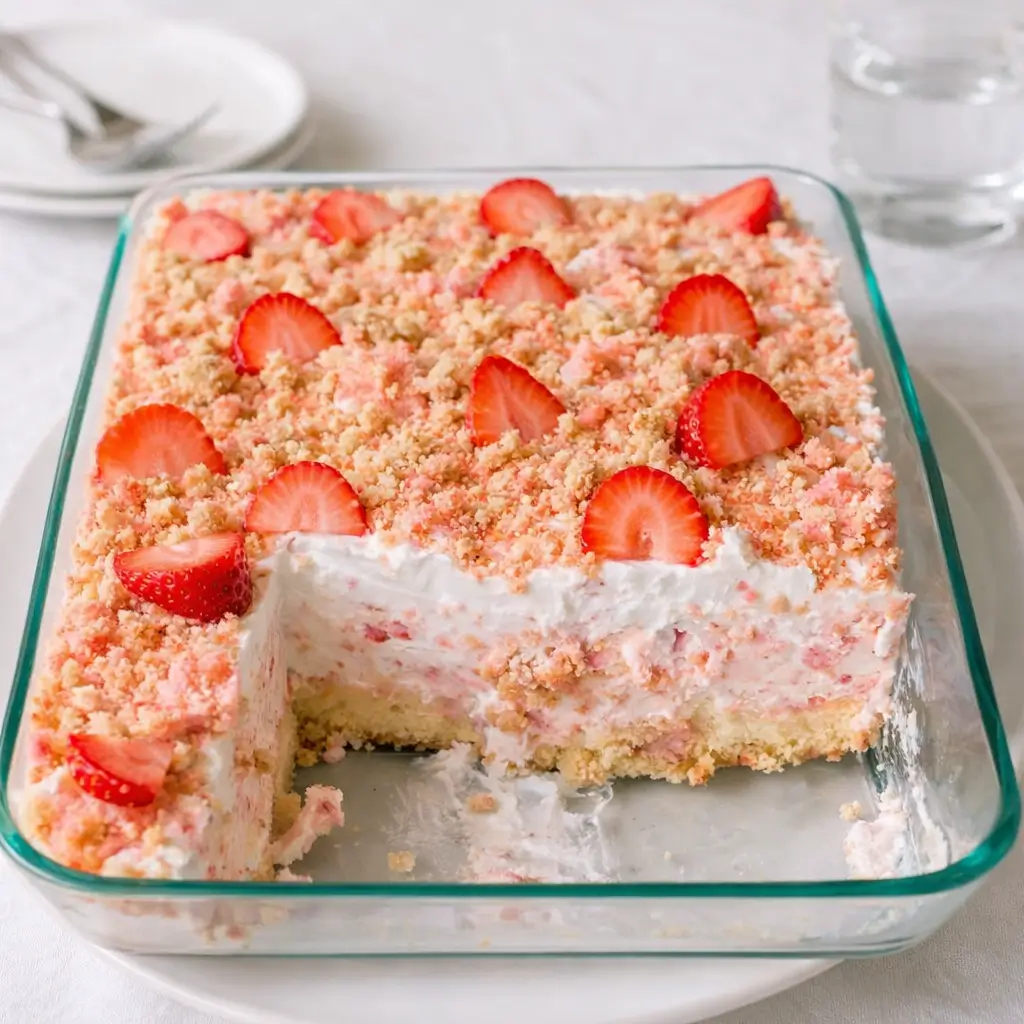
Easy Strawberry Crunch Poke Cake is like a trip back to your childhood—minus the melted ice cream and sticky fingers. Remember that iconic strawberry shortcake ice cream bar with the creamy center and the crunchy pink coating? This cake brings that nostalgic treat straight to your table, no ice cream truck required.
Moist, sweet, creamy, and topped with that signature strawberry crunch, it’s the perfect combination of fun and comfort. Whether you’re hosting a backyard BBQ, bringing dessert to a potluck, or just craving a midweek treat, this cake delivers in every bite. The best part? It’s practically foolproof and can be made ahead—music to every busy baker’s ears. Plus, it’s budget-friendly, crowd-pleasing, and just plain joyful. So grab your apron, let’s talk strawberry happiness in cake form.
Table of Contents
What is Easy Strawberry Crunch Poke Cake?
An Easy Strawberry Crunch Poke Cake is a simple yet show-stopping dessert inspired by the nostalgic strawberry shortcake bars we all loved as kids. It starts with a basic white cake—store-bought mix or homemade, your call—soaked in a sweet, creamy strawberry milk mixture that makes each bite soft, moist, and bursting with flavor.
Then it’s topped with whipped topping and a buttery golden Oreo-strawberry crunch that delivers that delightful contrast of creamy and crispy. The “poke” part of the name comes from the tiny holes poked all over the cake, allowing the strawberry milk mixture to seep in and create ribbons of flavor throughout. It’s a comforting, fun, and visually stunning dessert that screams celebration but is easy enough for a Tuesday night.
Reasons to Try Easy Strawberry Crunch Poke Cake
First off, this Easy Strawberry Crunch Poke Cake is ridiculously simple. You don’t need to be a seasoned baker to nail it—just a whisk, some patience, and a love for strawberries. It’s a great make-ahead dessert, meaning you can prepare it the night before and just pull it out of the fridge when you’re ready to impress. The flavor? Think strawberries and cream meets buttery cookies in a dreamy texture explosion.
It’s ideal for birthdays, Valentine’s Day, or even summer cookouts when turning on the oven feels like a bad idea. If you liked my Creamy Strawberry Truffles, you’ll adore this one—it has that same creamy sweetness but with an added satisfying crunch. And if you want a fun twist, this cake is also endlessly customizable—swap the jello flavor, change up the cookies, or add fresh fruit on top for a little freshness. It’s the dessert that keeps on giving.
Ingredients Needed to Make Easy Strawberry Crunch Poke Cake
To create your own Easy Strawberry Crunch Poke Cake, you’ll need:
- 1 baked 9×13 white cake (box mix or homemade)
- 12 ounces evaporated milk
- 3 ounces strawberry gelatin (divided)
- 14 ounces sweetened condensed milk
- ½ cup whole milk
- 8 ounces Cool Whip (thawed)
- 25 golden Oreos (about 1 package)
- ¼ cup salted butter, melted
Optional toppings: fresh strawberries, white chocolate drizzle, or even pink sprinkles if you’re feeling festive.
Instructions to Make Easy Strawberry Crunch Poke Cake – Step by Step
Step 1: Bake the Cake
Start by preheating your oven to 350°F—or whatever your cake mix calls for. Mix up your white cake batter according to the package directions, then pour it into a 9×13-inch baking dish. Bake until a toothpick inserted in the center comes out clean. The key here is to let the cake cool completely before moving on. This step may test your patience, but trust me, it’s worth it. Warm cake will turn the milk mixture into a soggy mess, and we’re going for moist, not mushy. While you wait, maybe check out my No-Bake Raspberry Cheesecake—another fruity dessert that’s low effort and high reward.
Step 2: Make the Strawberry Milk Soak
Grab a small saucepan and pour in the evaporated milk. Set it over medium heat and gently warm it—no boiling, please. Once it’s hot, whisk in half of your strawberry gelatin packet until it dissolves completely. This step is where the magic begins; you’ll start to smell that signature strawberry scent that’ll make your kitchen feel like summer. Remove it from the heat and let it cool for about 10 minutes.
Step 3: Mix the Creamy Soak
In a mixing bowl, combine the cooled strawberry milk mixture with the sweetened condensed milk and whole milk. Whisk until smooth and uniform—this is your magical soak mixture. It’s rich, velvety, and the secret behind that luscious, melt-in-your-mouth texture.
Step 4: Poke the Cake
Here comes the fun part. Using a skewer, chopstick, or the handle of a wooden spoon, poke holes all over the cooled cake. Aim for holes about an inch apart and halfway through the cake. This step-by-step process gives you those beautiful streaks of pink goodness when you slice it later.
Step 5: Pour and Chill
Slowly spoon your strawberry soak mixture evenly over the cake. Work patiently—this isn’t a race. You want every hole filled with that sweet, creamy liquid. Once you’ve poured it all, cover the dish tightly with plastic wrap and refrigerate for at least one hour. Overnight is even better, allowing the cake to absorb every drop of strawberry flavor.
Step 6: Add the Whipped Layer
Once your cake has chilled, spread the thawed Cool Whip evenly across the top. Use a spatula to smooth it out to the edges, making sure every bite gets that creamy topping. If you prefer homemade whipped cream, go for it! Just stabilize it with a little cream cheese or gelatin so it holds up.
Step 7: Make the Crunch Topping
Now for the pièce de résistance—the crunch! Place your golden Oreos in a sturdy zip-top bag and crush them using a rolling pin or a can. You’re aiming for a mix of fine crumbs and a few larger bits for texture. In a medium bowl, mix the crushed cookies with the melted butter and the remaining half of your strawberry gelatin powder. Stir until everything is evenly coated and vibrantly pink.
Step 8: Assemble and Chill Again
Sprinkle the cookie mixture generously over the whipped topping layer. Press gently with a spoon or spatula so it adheres well. You want a crunchy, even layer that stays put when sliced. Cover the cake again and chill for at least 30 minutes to let everything set.
Step 9: Serve and Savor
When it’s time to serve, cut generous squares and, if you like, top them with fresh strawberry slices or a drizzle of white chocolate. This step-by-step creation turns every bite into pure strawberry bliss. Serve chilled, and watch it disappear fast—trust me, there won’t be leftovers for long.
For more easy crowd-pleasers, try my Irresistible Easy No-Bake Grasshopper Pie or Valentine’s Day Red Velvet Truffles—they share the same make-ahead convenience and melt-in-your-mouth appeal.
What to Serve with Easy Strawberry Crunch Poke Cake
This cake pairs beautifully with simple accompaniments. A scoop of vanilla ice cream adds an extra creamy contrast, or serve it with a glass of cold milk for that old-school vibe. For a special brunch, add it to a dessert spread with my Mini St. Patrick’s Day Cheesecakes or Green Velvet Cupcakes. It also makes a sweet finale after a savory dish like Tempting Baked Cream Cheese Chicken.
Key Tips for Making Easy Strawberry Crunch Poke Cake
Make sure your cake is completely cooled before poking. This is the biggest difference between soggy and silky. Chill the cake long enough to let it absorb the milk mixture—at least an hour, but overnight is ideal. Crush your cookies to varying sizes for that satisfying texture contrast. Want to jazz it up? Mix in a handful of freeze-dried strawberries into the cookie layer or drizzle melted white chocolate on top. And if you’re hosting, make it in advance! This cake gets better with time as the flavors meld beautifully.
Storage and Reheating Tips for Easy Strawberry Crunch Poke Cake
This cake loves the fridge. Store it tightly covered for up to four days. The topping stays crunchy for about two days before softening slightly—but honestly, it’s still amazing. If you want to make it ahead, bake the cake and prepare the cookie topping separately, then assemble the soak and layers the day of serving. No need to reheat—it’s best served cold.
FAQs
Q: Can I use homemade cake instead of a mix?
Absolutely! Any 9×13 white or vanilla cake will work as long as it’s cooled.
Q: Why do I poke holes?
Poking holes allows the milk mixture to soak deep into the cake, giving every bite that deliciously moist texture.
Q: Can I use other jello flavors?
Definitely! Try raspberry, cherry, or even lemon for a twist.
Q: How far in advance can I make it?
You can prepare it a day ahead—it actually tastes even better after chilling overnight.
Q: Can I use real whipped cream?
Yes, but stabilize it with a little gelatin or cream cheese so it holds up.
Final Thoughts
This Easy Strawberry Crunch Poke Cake is one of those desserts that never fail to bring smiles. It’s a sweet nod to childhood favorites, but with the kind of flavor and texture that grown-ups still crave. The step-by-step process makes it approachable, the ingredients are easy to find, and the result? Pure, creamy, crunchy joy. So whether you’re baking for a birthday, a family gathering, or just because life needs something sweet, this cake will be your new go-to. It’s comfort, nostalgia, and celebration in one pan.
Visit our Pinterest for regular slow cooker recipe updates, or join our Facebook discussions where cooking fans exchange their favorite hearty meal ideas.
PrintEasy Strawberry Crunch Poke Cake – Quick, Creamy, and Crowd-Pleasing
Remember that amazing strawberry crunch ice cream bar from childhood? Bring that feeling home with this Easy Strawberry Crunch Poke Cake! Moist, creamy, bursting with strawberry, and topped with an irresistible crunchy layer.
- Prep Time: 35 minutes
- Cook Time: 35 minutes
- Total Time: 1 hour 10 minutes
- Yield: 1 9×13 cake 1x
- Category: Cake, Dessert
- Method: Baking, Refrigerated
- Cuisine: American
Ingredients
- 1 baked 9×13 white cake
- 12 ounces evaporated milk
- 3 ounces strawberry jello, divided in half
- 14 ounces sweetened condensed milk
- 0.5 cup whole milk
- 8 ounce Cool Whip or frozen whipped topping, thawed
- 25 golden Oreos (about 1 package)
- 0.25 cup salted butter, melted
Instructions
1. First things first, you need a baked cake! Preheat your oven to 350°F (or whatever temperature your cake mix package says) and mix up your white cake batter. Pour it into a 9×13-inch glass baking dish and bake according to the box instructions. Let that cake cool completely.
2. While the cake is cooling, make the milk soak. In a small saucepan, pour in the evaporated milk and heat over medium heat. Once warm, whisk in half of the strawberry gelatin powder. Stir until completely dissolved, then remove from heat and let cool.
3. Once the evaporated milk mixture has cooled slightly, whisk in the sweetened condensed milk and whole milk until fully combined.
4. Once your cake is completely cool, poke holes all over the surface using a skewer, chopstick, or spoon handle. Make holes about an inch apart and poke about halfway down.
5. Carefully spoon the strawberry milk mixture evenly over the cake, making sure it gets into the holes. Cover tightly with plastic wrap and refrigerate for at least 1 hour.
6. Remove cake from the fridge and gently spread the thawed Cool Whip evenly over the top of the cake.
7. Place golden Oreos in a sturdy plastic bag and crush using a rolling pin, can, or hands into a mix of fine crumbs and small pieces.
8. Transfer crushed cookies to a bowl. Pour melted butter over the crumbs, then sprinkle in the remaining half of the strawberry gelatin powder. Mix until evenly coated.
9. Sprinkle the cookie mixture over the Cool Whip layer. Gently press down with the back of a spoon or spatula to flatten. Slice and serve!
Notes
Why you’ll love this recipe: It’s fast (most time passive), easy, giftable, and crowd-pleasing with nostalgic flavor and texture.
Substitutions & Additions: Use vanilla or strawberry cake mix. Try raspberry, cherry, or strawberry-banana jello. Substitute vanilla wafers, shortbread, or graham crackers for Oreos. Use stabilized homemade whipped cream instead of Cool Whip. Garnish with fresh strawberries.
Tips for Success: Ensure cake is completely cool before poking. Poke plenty of evenly spaced holes. Allow cake at least 1 hour to soak (overnight is better). Crush cookies to a mix of fine crumbs and small pieces. Bake cake and make crunch ahead; prepare soak and assemble day of serving.
How to Store It: Cover tightly and store in the refrigerator for 3–4 days.
FAQs:
Q: Can I use homemade cake instead of a mix? A: Absolutely! Just bake your favorite 9×13-inch cake recipe and let it cool completely.
Q: Why do you poke holes in the cake? A: Poking holes allows the milk mixture to deeply soak into the cake, making it moist and flavorful.
Q: Can I make the entire cake the day before? A: Yes! It’s actually better after sitting overnight.
Q: Can I use fresh whipped cream? A: You can, but stabilize it for best results.
Nutrition
- Serving Size: 1 slice


