
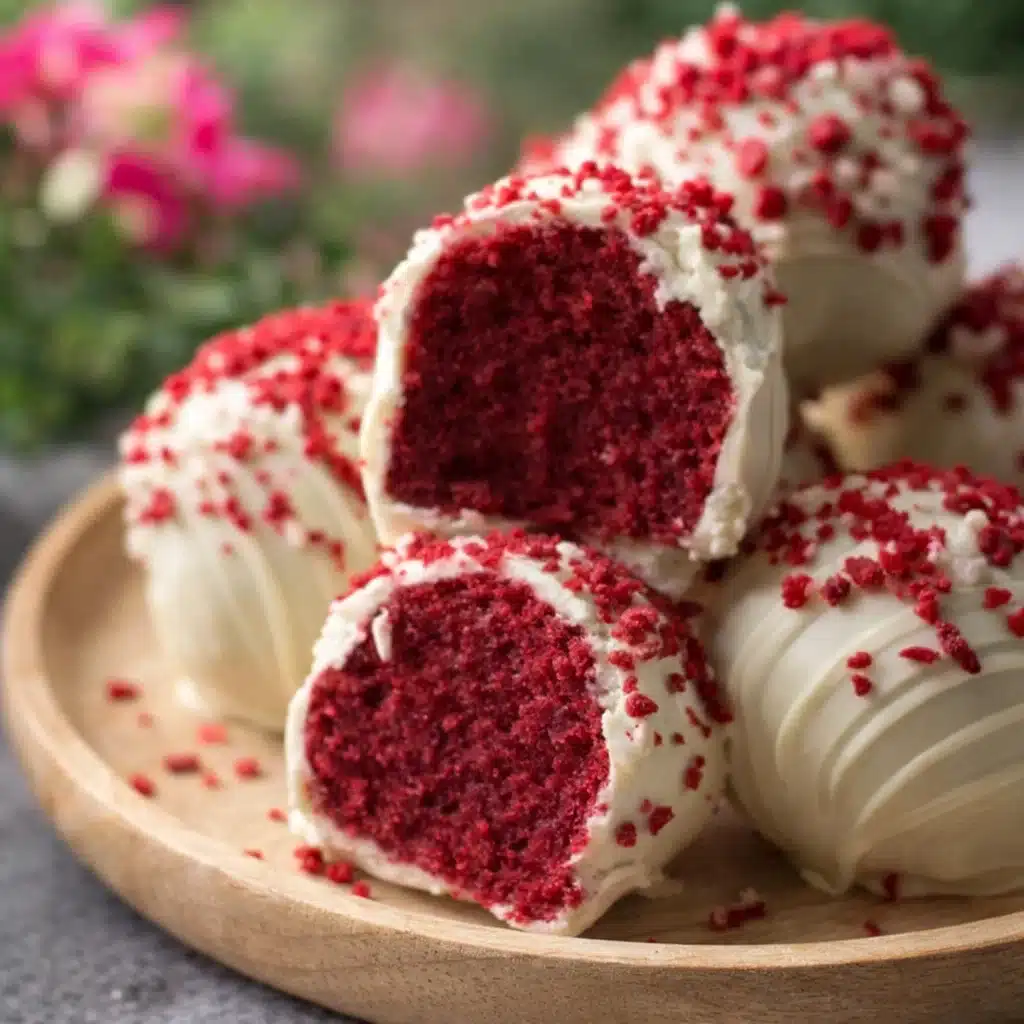
Valentine’s Day is the perfect time to show your loved ones just how much you care. And what better way to do that than with a batch of homemade Red Velvet Truffles? These little bites of bliss are rich, creamy, and oh-so-decadent—perfect for gifting, sharing, or enjoying as a sweet indulgence. Plus, they’re easy to make, even for those who are not seasoned bakers! If you’ve ever wondered how to take your Valentine’s Day game to the next level, look no further. These truffles will wow anyone lucky enough to receive them.
Table of Contents
What Are Valentine’s Day Red Velvet Truffles?
Valentine’s Day Red Velvet Truffles are bite-sized, no-bake treats made with the iconic red velvet cake flavors we all know and love. They combine the richness of red velvet cake crumbs with the smoothness of cream cheese frosting, creating a soft, melt-in-your-mouth center. The truffles are then dipped in white chocolate and finished off with a light dusting of cocoa powder or sprinkles for a fun, festive touch. These truffles are the ultimate combination of sweet and tangy, with a creamy texture that’s irresistible.
Reasons to Try Valentine’s Day Red Velvet Truffles
If you’re looking for a reason to whip up a batch of these truffles, let me give you a few. First, they are the perfect Valentine’s Day gift. You can easily package them in a cute box, making them a thoughtful and delicious present for that special someone. Secondly, these truffles are incredibly easy to make. You don’t need to be a master baker to get them just right. And let’s not forget that they are absolutely delicious—creamy, chocolaty, and sweet, with just the right balance of flavor. Whether you’re celebrating with your partner, friends, or family, these truffles will be a hit!
Ingredients Needed to Make Valentine’s Day Red Velvet Truffles
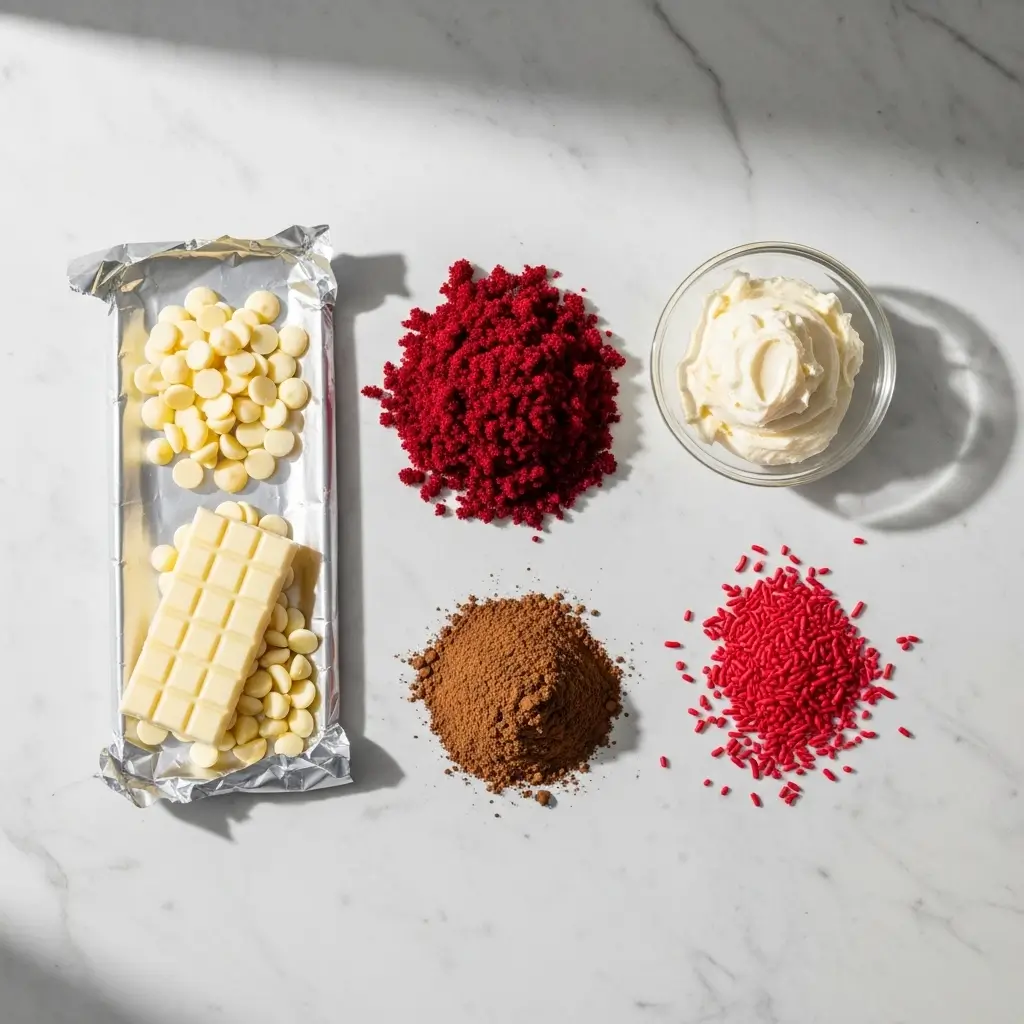
To make these Valentine’s Day Red Velvet Truffles, you’ll need a few simple ingredients that come together perfectly to create a rich, indulgent treat. Here’s what you’ll need:
- 1 cup red velvet cake crumbs (you can use leftover cake or bake one just for this!)
- 1/2 cup cream cheese frosting (store-bought or homemade)
- 8 oz white chocolate, melted
- 1/4 cup cocoa powder (for coating) or red sprinkles (for extra fun!)
That’s it! With just a few ingredients, you’ll have the perfect sweet treat for your Valentine’s Day celebration.
Step-by-Step Guide to Making Valentine’s Day Red Velvet Truffles
Making Valentine’s Day Red Velvet Truffles is a delightful experience that combines simple ingredients with easy-to-follow steps. Whether you’re a beginner or a seasoned baker, this step-by-step guide will walk you through the process with clear, detailed instructions, ensuring your truffles turn out perfectly every time. Let’s dive in and create some sweet magic for your special day!
Step 1: Prepare the Red Velvet Cake Crumbs
The first step in making your Valentine’s Day Red Velvet Truffles is to gather the red velvet cake crumbs. If you have leftover cake from a previous celebration or a store-bought red velvet cake, you’re all set! Simply crumble the cake into small pieces. If you’re starting fresh, you can bake a red velvet cake according to your favorite recipe. Once baked, let it cool completely before crumbling it into small crumbs.
If you prefer a quicker method, you can also use store-bought red velvet cake mix and follow the instructions on the box for baking. Once your cake is ready, crumble it up into a large bowl until you have about one cup of red velvet crumbs. The crumbs form the base of your truffles, so make sure they are finely crumbled but not powdery. For a guide on baking a perfect cake, check out our how to bake a cake from scratch for more tips!
Step 2: Mix the Cake Crumbs and Cream Cheese Frosting
In a medium bowl, add the red velvet cake crumbs and cream cheese frosting. Start mixing them together gently. The frosting acts as a binding agent, turning the crumbs into a dough-like consistency. You can use store-bought frosting for convenience or make your own homemade frosting (which adds an extra layer of love). For a simple frosting recipe, you can check out our frosting tips and tricks for some inspiration.
As you mix, ensure that all the cake crumbs are coated with the frosting. You’re aiming for a sticky, cohesive dough that’s easy to roll into balls. If the mixture feels too dry, add a little more frosting until it holds together perfectly. Once your mixture is ready, it’s time to move to the next step!
Step 3: Shape the Truffles
Now comes the fun part—shaping the truffles! Take small portions of the red velvet mixture and roll them into bite-sized balls, about 1-inch in diameter. It’s up to you if you want to make them smaller or larger, but remember that a smaller size will give you more truffles (which is always a good thing). If you find that the mixture is a bit too sticky to handle, you can chill it for a few minutes in the refrigerator before rolling. This will make it easier to shape the truffles without any mess.
If you need a bit of guidance on shaping or other techniques for working with truffle mixtures, feel free to explore our cake ball rolling guide. It has some helpful tips to ensure your truffles are perfectly round every time.
Step 4: Chill the Truffles
Once all the truffles are shaped, place them on a baking sheet lined with parchment paper. This will prevent the truffles from sticking as they chill. Now, pop the tray into the refrigerator and let them chill for about 30 minutes. Chilling helps the truffles firm up, making them easier to dip in melted chocolate later on.
While you wait, you can prepare your dipping station by melting the white chocolate. If you’re looking to get creative with the chocolate coating, you can even use dark or milk chocolate instead—feel free to swap based on your personal taste preferences. Looking for more chocolatey treats? Try our chocolate berry tart for another delicious, no-bake option!
Step 5: Melt the White Chocolate
While the truffles are chilling, it’s time to melt your white chocolate. This is a crucial step in ensuring a smooth and even coating. To do so, place the white chocolate in a microwave-safe bowl and heat it in 30-second intervals, stirring in between, until fully melted and smooth. You can also melt the chocolate using a double boiler method if you prefer. Just make sure the bowl is heatproof and doesn’t touch the water.
If you prefer to avoid microwaving, the double boiler method works wonders to keep the chocolate from seizing. Once your chocolate is melted, let it cool slightly before dipping the truffles.
Step 6: Dip the Truffles in Chocolate
Now, it’s time to coat the chilled truffles in the melted white chocolate. Hold each truffle by the edges and dip it into the chocolate, making sure it’s fully covered. Use a spoon to help coat the truffle evenly, ensuring all sides are covered in the velvety white chocolate. If you find the chocolate is dripping too much, you can tap the truffle gently on the side of the bowl to let the excess chocolate fall off.
Once dipped, return the truffles to the baking sheet lined with parchment paper. Don’t worry about perfection here—the beauty of truffles lies in their slightly imperfect, rustic look! If you prefer a more polished appearance, you can drizzle extra white chocolate over the top after they’ve set.
Step 7: Roll in Cocoa Powder or Sprinkles
While the chocolate coating is still wet, you can roll each truffle in cocoa powder or red sprinkles to add a festive touch. For a richer flavor, cocoa powder gives a nice contrast to the sweetness of the white chocolate and the tangy red velvet inside. If you’re in a celebratory mood and want to make them pop, red sprinkles will add a fun and colorful element to each bite.
Take a truffle in your hand and gently roll it in your chosen coating, then place it back on the parchment paper. The sprinkles or cocoa powder will stick to the chocolate as it hardens. If you want a little extra flair, consider rolling some truffles in both cocoa powder and sprinkles for a playful texture combination.
Step 8: Let the Truffles Cool and Set
Finally, let the truffles sit at room temperature until the chocolate coating is fully set. This usually takes about 20-30 minutes, depending on your room temperature. If you’re in a rush, you can pop them back into the fridge for a quicker set.
Once the chocolate has hardened, your Valentine’s Day Red Velvet Truffles are ready to enjoy! They’re perfect for gifting, sharing with loved ones, or indulging in a little self-care (because who doesn’t deserve a treat now and then?).
What to Serve with Valentine’s Day Red Velvet Truffles
While these Red Velvet Truffles are delicious on their own, they also pair wonderfully with a glass of champagne or a cup of hot cocoa—depending on your mood! If you want to serve them as part of a larger Valentine’s Day spread, consider adding some fresh fruit, like strawberries or raspberries, which complement the sweet flavors of the truffles. If you’re planning a romantic evening, these truffles make the perfect accompaniment to a candlelit dinner. Or, if you’re looking to indulge a bit more, a scoop of vanilla ice cream never hurt anyone.
Key Tips for Making Valentine’s Day Red Velvet Truffles
Making these truffles is pretty straightforward, but here are a few tips to ensure your truffles turn out as perfect as possible. First, when making the red velvet cake crumbs, don’t stress about them being perfectly uniform. A few larger pieces won’t hurt—just give the mixture a good mix to incorporate everything. If the truffle mixture feels too sticky to roll, chill it for a few minutes before shaping. And when it comes to dipping in the white chocolate, don’t rush it—take your time to make sure the truffles are coated evenly.
Storage and Reheating Tips for Valentine’s Day Red Velvet Truffles
Once your truffles are made and fully cooled, you can store them in an airtight container in the fridge for up to a week. If you want to make them ahead of time for a party or event, feel free to make them a few days in advance. They’re also freezer-friendly! Just place the truffles in a freezer-safe container, and they’ll last for up to 3 months. To thaw, simply take them out of the freezer and let them sit at room temperature for about 20 minutes. They’ll taste just as fresh as the day you made them!
FAQs
Can I use store-bought red velvet cake?
Absolutely! If you’re short on time, using store-bought red velvet cake is a great shortcut. Just crumble it up, and it’ll work perfectly in the truffles.
Can I use dark chocolate instead of white chocolate?
Of course! If you prefer dark chocolate, feel free to substitute it. The slight bitterness of dark chocolate pairs nicely with the sweetness of the red velvet.
How long do these truffles last?
Stored in the fridge, these truffles should last about a week. If you freeze them, they’ll last up to three months.
Final Thoughts
Valentine’s Day Red Velvet Truffles are the perfect way to indulge your sweet tooth and show someone you care, all while keeping things simple. With just a handful of ingredients and minimal effort, you’ll have a treat that’s sure to impress. Whether you’re sharing them with your significant other, your friends, or keeping them all to yourself, these truffles are a sweet way to celebrate love. So, what are you waiting for? Get to making these delicious little bites of joy—you won’t regret it!
Visit our Pinterest for regular slow cooker recipe updates, or join our Facebook discussions where cooking fans exchange their favorite hearty meal ideas.
PrintValentine’s Day Red Velvet Truffles: A Sweet Treat for Your Loved Ones
Delicious red velvet truffles perfect for Valentine’s Day.
- Prep Time: 20 minutes
- Cook Time: 0 minutes
- Total Time: 50 minutes
- Yield: 24 truffles 1x
- Category: Dessert
- Method: No-bake
- Cuisine: American
- Diet: Vegetarian
Ingredients
- 1 cup red velvet cake crumbs
- 1/2 cup cream cheese frosting
- 8 oz white chocolate, melted
- 1/4 cup cocoa powder
- 1/4 cup red sprinkles
Instructions
1. Mix the red velvet cake crumbs and cream cheese frosting until combined.
2. Roll the mixture into small balls.
3. Chill the balls in the refrigerator for 30 minutes.
4. Dip each ball into melted white chocolate.
5. Roll in cocoa powder or sprinkles before the chocolate sets.
6. Let the truffles cool on a baking sheet.
Notes
Use leftover cake or freshly baked red velvet cake.
Store truffles in an airtight container.
These truffles can be frozen for later use.
Nutrition
- Serving Size: 1 truffle
- Calories: 120
- Sugar: 10g
- Sodium: 30mg
- Fat: 7g
- Saturated Fat: 4g
- Unsaturated Fat: 2g
- Trans Fat: 0g
- Carbohydrates: 14g
- Fiber: 0g
- Protein: 1g
- Cholesterol: 10mg


